How to Write Code That Pulls Data and Saves It and Then Doesnt Run Again Pythonn
Python and SQL are two of the virtually important languages for Data Analysts.
In this article I will walk yous through everything you need to know to connect Python and SQL.
Y'all'll acquire how to pull information from relational databases directly into your machine learning pipelines, shop data from your Python application in a database of your own, or whatsoever other use instance y'all might come up with.
Together we will cover:
- Why learn how to use Python and SQL together?
- How to ready your Python environs and MySQL Server
- Connecting to MySQL Server in Python
- Creating a new Database
- Creating Tables and Table Relationships
- Populating Tables with Information
- Reading Data
- Updating Records
- Deleting Records
- Creating Records from Python Lists
- Creating re-usable functions to do all of this for united states of america in the future
That is a lot of very useful and very cool stuff. Allow's get into it!
A quick note before we outset: at that place is a Jupyter Notebook containing all the code used in this tutorial available in this GitHub repository. Coding along is highly recommended!
The database and SQL code used hither is all from my previous Introduction to SQL series posted on Towards Information Scientific discipline (contact me if you have any problems viewing the manufactures and I can send you a link to run into them for free).
If yous are not familiar with SQL and the concepts backside relational databases, I would point you towards that series (plus in that location is of course a huge amount of great stuff available hither on freeCodeCamp!)
Why Python with SQL?
For Data Analysts and Information Scientists, Python has many advantages. A huge range of open up-source libraries make information technology an incredibly useful tool for any Data Annotator.
Nosotros have pandas, NumPy and Vaex for data analysis, Matplotlib, seaborn and Bokeh for visualisation, and TensorFlow, scikit-larn and PyTorch for motorcar learning applications (plus many, many more).
With its (relatively) easy learning curve and versatility, it's no wonder that Python is one of the fastest-growing programming languages out in that location.
So if we're using Python for data analysis, it's worth asking - where does all this information come from?
While at that place is a massive multifariousness of sources for datasets, in many cases - peculiarly in enterprise businesses - data is going to be stored in a relational database. Relational databases are an extremely efficient, powerful and widely-used way to create, read, update and delete data of all kinds.
The most widely used relational database management systems (RDBMSs) - Oracle, MySQL, Microsoft SQL Server, PostgreSQL, IBM DB2 - all utilize the Structured Query Language (SQL) to access and brand changes to the information.
Note that each RDBMS uses a slightly different flavor of SQL, so SQL lawmaking written for one volition usually not piece of work in another without (normally fairly pocket-sized) modifications. Simply the concepts, structures and operations are largely identical.
This means for a working Information Annotator, a strong agreement of SQL is hugely important. Knowing how to employ Python and SQL together will give you even more of an advantage when it comes to working with your data.
The remainder of this article will be devoted to showing you exactly how we can do that.
Getting Started
Requirements & Installation
To code along with this tutorial, you will need your own Python environment set.
I utilise Anaconda, only in that location are lots of ways to do this. Just google "how to install Python" if you need further help. Y'all tin can also use Folder to code forth with the associated Jupyter Notebook.
Nosotros will exist using MySQL Community Server as it is free and widely used in the industry. If you are using Windows, this guide volition aid y'all get prepare up. Here are guides for Mac and Linux users as well (although it may vary past Linux distribution).
Once you have those ready, we volition demand to get them to communicate with each other.
For that, we need to install the MySQL Connector Python library. To do this, follow the instructions, or just use pip:
pip install mysql-connector-python We are also going to be using pandas, so make certain that you take that installed as well.
pip install pandas Importing Libraries
Every bit with every project in Python, the very first thing we want to do is import our libraries.
It is best practise to import all the libraries nosotros are going to use at the start of the project, then people reading or reviewing our lawmaking know roughly what is coming up and so at that place are no surprises.
For this tutorial, we are but going to use ii libraries - MySQL Connector and pandas.
import mysql.connector from mysql.connector import Error import pandas every bit pd We import the Mistake function separately so that we accept easy access to it for our functions.
Connecting to MySQL Server
By this point we should have MySQL Community Server set up on our organisation. At present nosotros demand to write some code in Python that lets us establish a connection to that server.
def create_server_connection(host_name, user_name, user_password): connection = None attempt: connection = mysql.connector.connect( host=host_name, user=user_name, passwd=user_password ) print("MySQL Database connection successful") except Fault as err: print(f"Fault: '{err}'") return connection Creating a re-usable function for code like this is best practice, so that we can use this again and again with minimum attempt. Once this is written once you can re-use information technology in all of your projects in the future also, and then future-you will exist grateful!
Let'due south go through this line by line so we sympathize what's happening here:
The first line is us naming the role (create_server_connection) and naming the arguments that that office volition take (host_name, user_name and user_password).
The next line closes any existing connections so that the server doesn't become confused with multiple open connections.
Side by side we apply a Python endeavor-except block to handle any potential errors. The starting time part tries to create a connection to the server using the mysql.connector.connect() method using the details specified by the user in the arguments. If this works, the function prints a happy petty success message.
The except function of the cake prints the error which MySQL Server returns, in the unfortunate circumstance that there is an error.
Finally, if the connection is successful, the function returns a connexion object.
Nosotros utilize this in practice by assigning the output of the office to a variable, which then becomes our connection object. We can then apply other methods (such as cursor) to information technology and create other useful objects.
connexion = create_server_connection("localhost", "root", pw) This should produce a success message:

Creating a New Database
Now that we have established a connection, our side by side step is to create a new database on our server.
In this tutorial we will do this simply once, only again we volition write this equally a re-usable function then nosotros take a nice useful function nosotros can re-use for future projects.
def create_database(connection, query): cursor = connectedness.cursor() try: cursor.execute(query) print("Database created successfully") except Mistake as err: print(f"Mistake: '{err}'") This part takes two arguments, connectedness (our connectedness object) and query (a SQL query which we volition write in the side by side step). Information technology executes the query in the server via the connexion.
We use the cursor method on our connectedness object to create a cursor object (MySQL Connector uses an object-oriented programming paradigm, and so there are lots of objects inheriting properties from parent objects).
This cursor object has methods such as execute, executemany (which we volition apply in this tutorial) along with several other useful methods.
If it helps, nosotros can think of the cursor object every bit providing u.s. access to the blinking cursor in a MySQL Server terminal window.

Next we define a query to create the database and phone call the function:

All the SQL queries used in this tutorial are explained in my Introduction to SQL tutorial series, and the full code can be found in the associated Jupyter Notebook in this GitHub repository, so I will not be providing explanations of what the SQL lawmaking does in this tutorial.
This is perchance the simplest SQL query possible, though. If you can read English yous tin probably work out what it does!
Running the create_database part with the arguments every bit above results in a database chosen 'school' beingness created in our server.
Why is our database chosen 'school'? Perhaps now would be a skilful time to wait in more detail at exactly what we are going to implement in this tutorial.
Our Database

Following the example in my previous series, we are going to be implementing the database for the International Language Schoolhouse - a fictional language training school which provides professional language lessons to corporate clients.
This Entity Relationship Diagram (ERD) lays out our entities (Teacher, Client, Class and Participant) and defines the relationships between them.
All the information regarding what an ERD is and what to consider when creating 1 and designing a database can be found in this article.
The raw SQL code, database requirements, and information to become into the database is all independent in this GitHub repository, merely you'll see it all equally we become through this tutorial too.
Connecting to the Database
Now that we accept created a database in MySQL Server, nosotros can alter our create_server_connection function to connect directly to this database.
Note that it'south possible - mutual, in fact - to have multiple databases on i MySQL Server, and so we desire to e'er and automatically connect to the database we're interested in.
We can do this like and then:
def create_db_connection(host_name, user_name, user_password, db_name): connection = None endeavour: connection = mysql.connector.connect( host=host_name, user=user_name, passwd=user_password, database=db_name ) print("MySQL Database connection successful") except Mistake as err: print(f"Error: '{err}'") return connection This is the exact same function, but now we take one more argument - the database name - and laissez passer that as an argument to the connect() method.
Creating a Query Execution Function
The final role we're going to create (for at present) is an extremely vital one - a query execution office. This is going to take our SQL queries, stored in Python as strings, and laissez passer them to the cursor.execute() method to execute them on the server.
def execute_query(connection, query): cursor = connexion.cursor() try: cursor.execute(query) connection.commit() print("Query successful") except Error as err: print(f"Error: '{err}'") This function is exactly the same as our create_database function from earlier, except that it uses the connection.commit() method to brand sure that the commands detailed in our SQL queries are implemented.
This is going to be our workhorse function, which we will apply (aslope create_db_connection) to create tables, establish relationships between those tables, populate the tables with data, and update and delete records in our database.
If you're a SQL expert, this function will let you execute any and all of the complex commands and queries y'all might accept lying around, direct from a Python script. This tin can be a very powerful tool for managing your information.
Creating Tables
Now we're all set up to start running SQL commands into our Server and to start building our database. The kickoff affair we want to do is to create the necessary tables.
Let'southward start with our Teacher table:
create_teacher_table = """ CREATE Tabular array teacher ( teacher_id INT PRIMARY KEY, first_name VARCHAR(xl) Not NULL, last_name VARCHAR(40) NOT Zip, language_1 VARCHAR(iii) Not NULL, language_2 VARCHAR(3), dob Engagement, tax_id INT UNIQUE, phone_no VARCHAR(20) ); """ connection = create_db_connection("localhost", "root", pow, db) # Connect to the Database execute_query(connectedness, create_teacher_table) # Execute our divers query Beginning of all we assign our SQL command (explained in detail here) to a variable with an advisable name.
In this case we use Python'south triple quote notation for multi-line strings to shop our SQL query, then nosotros feed it into our execute_query function to implement information technology.
Note that this multi-line formatting is purely for the benefit of humans reading our code. Neither SQL nor Python 'care' if the SQL command is spread out like this. So long as the syntax is correct, both languages volition accept it.
For the benefit of humans who will read your lawmaking, withal, (even if that will simply exist future-you!) information technology is very useful to practise this to make the code more readable and understandable.
The aforementioned is true for the CAPITALISATION of operators in SQL. This is a widely-used convention that is strongly recommended, simply the actual software that runs the code is case-insensitive and will treat 'CREATE TABLE teacher' and 'create table teacher' as identical commands.

Running this code gives us our success messages. We can also verify this in the MySQL Server Control Line Client:

Great! Now let'due south create the remaining tables.
create_client_table = """ CREATE TABLE customer ( client_id INT Chief KEY, client_name VARCHAR(forty) NOT NULL, address VARCHAR(60) NOT Nothing, industry VARCHAR(twenty) ); """ create_participant_table = """ CREATE Tabular array participant ( participant_id INT Principal KEY, first_name VARCHAR(40) Non NULL, last_name VARCHAR(xl) Not Zip, phone_no VARCHAR(20), customer INT ); """ create_course_table = """ CREATE TABLE course ( course_id INT Chief Fundamental, course_name VARCHAR(40) Not Cypher, language VARCHAR(3) NOT Goose egg, level VARCHAR(2), course_length_weeks INT, start_date DATE, in_school BOOLEAN, teacher INT, client INT ); """ connection = create_db_connection("localhost", "root", pow, db) execute_query(connection, create_client_table) execute_query(connection, create_participant_table) execute_query(connexion, create_course_table) This creates the four tables necessary for our iv entities.
At present we desire to define the relationships between them and create one more table to handle the many-to-many relationship betwixt the participant and form tables (run into hither for more details).
We practice this in exactly the same way:
alter_participant = """ Change Table participant ADD Foreign KEY(client) REFERENCES customer(client_id) ON DELETE SET NULL; """ alter_course = """ ALTER TABLE course ADD FOREIGN Key(teacher) REFERENCES teacher(teacher_id) ON DELETE Set Nada; """ alter_course_again = """ Modify TABLE class ADD Foreign KEY(client) REFERENCES client(client_id) ON DELETE SET NULL; """ create_takescourse_table = """ CREATE TABLE takes_course ( participant_id INT, course_id INT, Main KEY(participant_id, course_id), FOREIGN KEY(participant_id) REFERENCES participant(participant_id) ON DELETE Pour, Foreign Fundamental(course_id) REFERENCES course(course_id) ON DELETE Pour ); """ connection = create_db_connection("localhost", "root", pw, db) execute_query(connection, alter_participant) execute_query(connection, alter_course) execute_query(connection, alter_course_again) execute_query(connection, create_takescourse_table) Now our tables are created, forth with the appropriate constraints, primary key, and foreign key relations.
Populating the Tables
The side by side footstep is to add some records to the tables. Once again we use execute_query to feed our existing SQL commands into the Server. Permit's over again start with the Teacher table.
pop_teacher = """ INSERT INTO teacher VALUES (1, 'James', 'Smith', 'ENG', Cypher, '1985-04-20', 12345, '+491774553676'), (two, 'Stefanie', 'Martin', 'FRA', NULL, '1970-02-17', 23456, '+491234567890'), (iii, 'Steve', 'Wang', 'MAN', 'ENG', '1990-11-12', 34567, '+447840921333'), (iv, 'Friederike', 'Müller-Rossi', 'DEU', 'ITA', '1987-07-07', 45678, '+492345678901'), (5, 'Isobel', 'Ivanova', 'RUS', 'ENG', '1963-05-30', 56789, '+491772635467'), (vi, 'Niamh', 'Murphy', 'ENG', 'IRI', '1995-09-08', 67890, '+491231231232'); """ connexion = create_db_connection("localhost", "root", pw, db) execute_query(connectedness, pop_teacher) Does this piece of work? We tin can check once again in our MySQL Command Line Client:

Now to populate the remaining tables.
pop_client = """ INSERT INTO customer VALUES (101, 'Big Business concern Federation', '123 Falschungstraße, 10999 Berlin', 'NGO'), (102, 'eCommerce GmbH', '27 Ersatz Allee, 10317 Berlin', 'Retail'), (103, 'AutoMaker AG', '20 Künstlichstraße, 10023 Berlin', 'Car'), (104, 'Banko Bank', '12 Betrugstraße, 12345 Berlin', 'Cyberbanking'), (105, 'WeMoveIt GmbH', '138 Arglistweg, 10065 Berlin', 'Logistics'); """ pop_participant = """ INSERT INTO participant VALUES (101, 'Marina', 'Berg','491635558182', 101), (102, 'Andrea', 'Duerr', '49159555740', 101), (103, 'Philipp', 'Probst', '49155555692', 102), (104, 'René', 'Brandt', '4916355546', 102), (105, 'Susanne', 'Shuster', '49155555779', 102), (106, 'Christian', 'Schreiner', '49162555375', 101), (107, 'Harry', 'Kim', '49177555633', 101), (108, 'Jan', 'Nowak', '49151555824', 101), (109, 'Pablo', 'Garcia', '49162555176', 101), (110, 'Melanie', 'Dreschler', '49151555527', 103), (111, 'Dieter', 'Durr', '49178555311', 103), (112, 'Max', 'Mustermann', '49152555195', 104), (113, 'Maxine', 'Mustermann', '49177555355', 104), (114, 'Heiko', 'Fleischer', '49155555581', 105); """ pop_course = """ INSERT INTO grade VALUES (12, 'English for Logistics', 'ENG', 'A1', ten, '2020-02-01', Truthful, i, 105), (thirteen, 'Beginner English', 'ENG', 'A2', xl, '2019-11-12', FALSE, six, 101), (fourteen, 'Intermediate English', 'ENG', 'B2', 40, '2019-11-12', FALSE, half-dozen, 101), (fifteen, 'Avant-garde English', 'ENG', 'C1', twoscore, '2019-11-12', FALSE, 6, 101), (16, 'Standard mandarin für Autoindustrie', 'MAN', 'B1', 15, '2020-01-15', Truthful, iii, 103), (17, 'Français intermédiaire', 'FRA', 'B1', eighteen, '2020-04-03', Simulated, 2, 101), (18, 'Deutsch für Anfänger', 'DEU', 'A2', 8, '2020-02-xiv', True, 4, 102), (19, 'Intermediate English', 'ENG', 'B2', 10, '2020-03-29', Fake, ane, 104), (xx, 'Fortgeschrittenes Russisch', 'RUS', 'C1', 4, '2020-04-08', Imitation, 5, 103); """ pop_takescourse = """ INSERT INTO takes_course VALUES (101, fifteen), (101, 17), (102, 17), (103, 18), (104, 18), (105, 18), (106, xiii), (107, 13), (108, 13), (109, fourteen), (109, 15), (110, 16), (110, 20), (111, sixteen), (114, 12), (112, 19), (113, 19); """ connection = create_db_connection("localhost", "root", pw, db) execute_query(connection, pop_client) execute_query(connection, pop_participant) execute_query(connexion, pop_course) execute_query(connection, pop_takescourse) Amazing! Now we take created a database complete with relations, constraints and records in MySQL, using nothing simply Python commands.
Nosotros have gone through this step by step to keep it understandable. But by this indicate yous can see that this could all very easily be written into one Python script and executed in one control in the terminal. Powerful stuff.
Reading Data
Now we have a functional database to piece of work with. As a Data Annotator, you are probable to come into contact with existing databases in the organisations where you work. It will be very useful to know how to pull data out of those databases so it can then be fed into your python data pipeline. This is what we are going to work on adjacent.
For this, we will demand one more function, this fourth dimension using cursor.fetchall() instead of cursor.commit(). With this function, we are reading data from the database and will not be making whatever changes.
def read_query(connection, query): cursor = connection.cursor() event = None endeavour: cursor.execute(query) result = cursor.fetchall() return outcome except Error as err: print(f"Error: '{err}'") Once more, we are going to implement this in a very like fashion to execute_query. Let's try it out with a simple query to see how it works.
q1 = """ SELECT * FROM teacher; """ connection = create_db_connection("localhost", "root", pw, db) results = read_query(connection, q1) for result in results: print(result) 
Exactly what we are expecting. The function as well works with more complex queries, such every bit this one involving a JOIN on the course and client tables.
q5 = """ SELECT grade.course_id, class.course_name, grade.language, client.client_name, customer.address FROM course Join client ON course.client = client.client_id WHERE course.in_school = FALSE; """ connection = create_db_connection("localhost", "root", pow, db) results = read_query(connection, q5) for issue in results: print(upshot) 
Very prissy.
For our information pipelines and workflows in Python, we might want to get these results in different formats to make them more useful or set for usa to manipulate.
Let's get through a couple of examples to run into how nosotros can practise that.
Formatting Output into a List
#Initialise empty list from_db = [] # Loop over the results and append them into our list # Returns a list of tuples for effect in results: result = result from_db.suspend(event) 
Formatting Output into a List of Lists
# Returns a list of lists from_db = [] for issue in results: result = list(result) from_db.append(effect) 
Formatting Output into a pandas DataFrame
For Information Analysts using Python, pandas is our cute and trusted old friend. It's very simple to convert the output from our database into a DataFrame, and from in that location the possibilities are endless!
# Returns a list of lists and then creates a pandas DataFrame from_db = [] for effect in results: upshot = list(result) from_db.append(result) columns = ["course_id", "course_name", "language", "client_name", "address"] df = pd.DataFrame(from_db, columns=columns) 
Hopefully y'all tin can see the possibilities unfolding in front of you here. With just a few lines of lawmaking, we tin can easily excerpt all the data we can handle from the relational databases where it lives, and pull it into our state-of-the-art data analytics pipelines. This is really helpful stuff.
Updating Records
When we are maintaining a database, we volition sometimes need to brand changes to existing records. In this department nosotros are going to look at how to practice that.
Let'southward say the ILS is notified that one of its existing clients, the Big Business Federation, is moving offices to 23 Fingiertweg, 14534 Berlin. In this case, the database ambassador (that'south united states of america!) will need to brand some changes.
Thankfully, we can practise this with our execute_query function alongside the SQL UPDATE statement.
update = """ UPDATE client SET address = '23 Fingiertweg, 14534 Berlin' WHERE client_id = 101; """ connection = create_db_connection("localhost", "root", pw, db) execute_query(connection, update) Annotation that the WHERE clause is very important hither. If we run this query without the WHERE clause, and so all addresses for all records in our Client table would be updated to 23 Fingiertweg. That is very much not what we are looking to exercise.
Also note that we used "WHERE client_id = 101" in the UPDATE query. It would also have been possible to utilize "WHERE client_name = 'Big Business Federation'" or "WHERE address = '123 Falschungstraße, 10999 Berlin'" or even "WHERE accost Like '%Falschung%'".
The important affair is that the WHERE clause allows us to uniquely identify the record (or records) we want to update.
Deleting Records
It is also possible use our execute_query office to delete records, by using DELETE.
When using SQL with relational databases, we need to be careful using the DELETE operator. This isn't Windows, at that place is no 'Are you sure you want to delete this?' warning popular-up, and there is no recycling bin. One time we delete something, information technology'south actually gone.
With that said, nosotros do really need to delete things sometimes. So let'southward have a look at that by deleting a course from our Class table.
Get-go of all let'due south remind ourselves what courses we take.
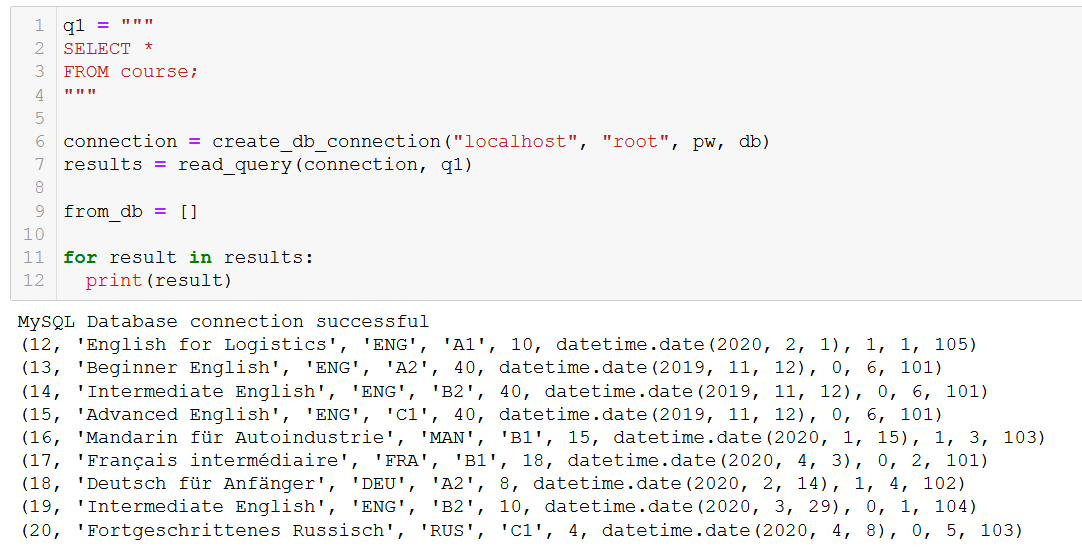
Allow's say course 20, 'Fortgeschrittenes Russisch' (that'south 'Avant-garde Russian' to yous and me), is coming to an stop, so we demand to remove it from our database.
By this stage, you lot will not be at all surprised with how we do this - salvage the SQL command as a cord, so feed information technology into our workhorse execute_query function.
delete_course = """ DELETE FROM course WHERE course_id = xx; """ connexion = create_db_connection("localhost", "root", pw, db) execute_query(connectedness, delete_course) Let'southward check to confirm that had the intended upshot:
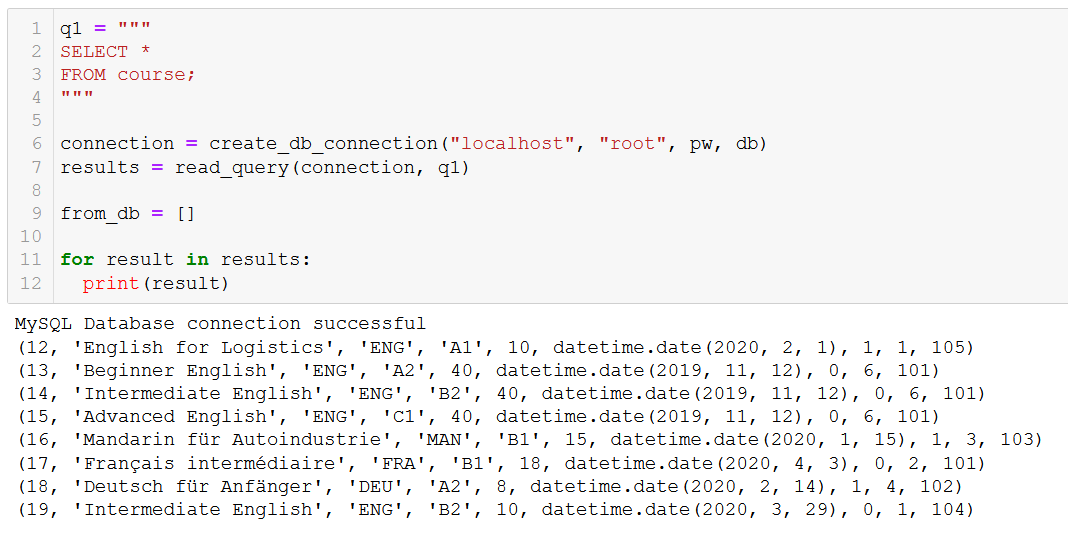
'Avant-garde Russian' is gone, as we expected.
This also works with deleting entire columns using Driblet COLUMN and whole tables using Driblet Table commands, only we volition not cover those in this tutorial.
Get ahead and experiment with them, even so - it doesn't matter if you delete a column or table from a database for a fictional school, and information technology'southward a adept idea to get comfortable with these commands earlier moving into a production surroundings.
Oh Grime
By this indicate, nosotros are at present able to complete the iv major operations for persistent data storage.
We have learned how to:
- Create - entirely new databases, tables and records
- Read - extract data from a database, and shop that information in multiple formats
- Update - brand changes to existing records in the database
- Delete - remove records which are no longer needed
These are fantastically useful things to exist able to do.
Before we terminate things upwardly here, we have 1 more very handy skill to learn.
Creating Records from Lists
We saw when populating our tables that nosotros can utilize the SQL INSERT command in our execute_query function to insert records into our database.
Given that we're using Python to dispense our SQL database, information technology would be useful to exist able to take a Python data structure (such every bit a list) and insert that directly into our database.
This could be useful when we want to store logs of user activity on a social media app we have written in Python, or input from users into a Wiki nosotros accept built, for case. There are as many possible uses for this as you lot tin think of.
This method is also more than secure if our database is open up to our users at any point, every bit information technology helps to prevent against SQL Injection attacks, which can damage or even destroy our whole database.
To do this, we will write a function using the executemany() method, instead of the simpler execute() method we have been using thus far.
def execute_list_query(connection, sql, val): cursor = connection.cursor() try: cursor.executemany(sql, val) connection.commit() print("Query successful") except Mistake every bit err: print(f"Error: '{err}'") Now we take the function, nosotros need to define an SQL command ('sql') and a list containing the values we wish to enter into the database ('val'). The values must be stored as a listing of tuples, which is a fairly common way to store data in Python.
To add 2 new teachers to the database, we tin write some code similar this:
sql = ''' INSERT INTO instructor (teacher_id, first_name, last_name, language_1, language_2, dob, tax_id, phone_no) VALUES (%s, %s, %s, %s, %s, %s, %due south, %due south) ''' val = [ (7, 'Hank', 'Dodson', 'ENG', None, '1991-12-23', 11111, '+491772345678'), (viii, 'Sue', 'Perkins', 'Human being', 'ENG', '1976-02-02', 22222, '+491443456432') ] Notice here that in the 'sql' code we utilise the '%s' every bit a placeholder for our value. The resemblance to the '%s' placeholder for a string in python is just casual (and frankly, very confusing), we desire to use '%southward' for all data types (strings, ints, dates, etc) with the MySQL Python Connector.
You tin run into a number of questions on Stackoverflow where someone has become confused and tried to use '%d' placeholders for integers because they're used to doing this in Python. This won't work here - nosotros need to employ a '%s' for each column we want to add together a value to.
The executemany function then takes each tuple in our 'val' list and inserts the relevant value for that cavalcade in place of the placeholder and executes the SQL command for each tuple contained in the listing.
This can exist performed for multiple rows of data, then long as they are formatted correctly. In our example we will just add two new teachers, for illustrative purposes, but in principle we can add as many equally we would similar.
Let's get ahead and execute this query and add the teachers to our database.
connection = create_db_connection("localhost", "root", prisoner of war, db) execute_list_query(connection, sql, val) 
Welcome to the ILS, Hank and Sue!
This is yet some other deeply useful function, allowing us to take data generated in our Python scripts and applications, and enter them straight into our database.
Conclusion
Nosotros have covered a lot of basis in this tutorial.
Nosotros accept learned how to utilize Python and MySQL Connector to create an entirely new database in MySQL Server, create tables inside that database, define the relationships betwixt those tables, and populate them with data.
We accept covered how to Create, Read, Update and Delete data in our database.
We have looked at how to extract data from existing databases and load them into pandas DataFrames, ready for analysis and further work taking reward of all the possibilities offered by the PyData stack.
Going in the other direction, we take also learned how to take data generated by our Python scripts and applications, and write those into a database where they can be safely stored for later retrieval and manipulation.
I hope this tutorial has helped you lot to see how we can employ Python and SQL together to exist able to manipulate information even more than effectively!
If yous'd similar to see more of my projects and work, please visit my website at craigdoesdata.de. If you have any feedback on this tutorial, please contact me straight - all feedback is warmly received!
Learn to code for free. freeCodeCamp'due south open up source curriculum has helped more than 40,000 people go jobs as developers. Become started
Source: https://www.freecodecamp.org/news/connect-python-with-sql/
0 Response to "How to Write Code That Pulls Data and Saves It and Then Doesnt Run Again Pythonn"
Postar um comentário